Nestled in the rolling hills of Virginia is the small town of Louisa where the narrow winding roads have speed limits that would make frequent travelers of the capital beltway blush, restaurants serve enormous (and inexpensive) portions of food, everyone says please and thank you, and of course, everyone knows each other. A great place to spend the weekend. I can’t say I got used to the speeds people drive those roads but I certainly enjoyed the food, the hospitality, and the general small town feel. Shooting from one hilltop to another, the hills in the area make for an very nice platform for shooting long distances. The outfit teaching the class: Central Virginia Tactical. We were extremely fortunate in regards to the weather. We had a string of weekends this past month that have either been blistering hot or rainy. Mostly rainy. This past weekend though couldn’t have been better. Highs around seventy, a decent cover of clouds without a drop of rain, and a relative gentle wind that could at times get frisky but never overly rough.
I have been preparing and looking forward to this class for close to six months now. I bought a new rifle in 6.5 Creedmoor just for this course. As I wrote in my previous post, I even purchased a computer simulation that I had hoped would make some of the skills I expected to need that much more familiar. I was as ready as possible and I wouldn’t be disappointed. The first half of day one was spent discussing the basic aspects of long range shooting. Topics revolved around equipment, the shooter, and the environment. Obviously equipment included the rifle and its optics, but interestingly the bulk of the discussion revolved around support gear. Specifically the bipod and the rear bag. It became clear right from this point that our instructor was going to dispute some very commonly held views such as loading the bipod and lying directly behind the rifle. A common theme when talking about setting up the proper position for prone shooting is insuring that you don’t create any unnecessary muscle tension. Loading the Bipod is directly counter to this premise. It introduces unnecessary muscle tension. The loading of the bipod is traditionally done to help manage recoil and help keep the rifle from jumping. So how were we going to manage recoil? By properly shouldering the rifle and maintaining good body position. To further stir up controversy we were instructed to use a prone position angled away from the line of fire. This of course is counter to the commonly taught practice of keeping the body directly behind the rifle in line with the line of fire. So why the difference? Because the angled position is more conducive to the type of shooting we are doing. That is to say competition style precision shooting. In a tactical situation by all means use the more traditional position. Its primary advantage being that it makes you a smaller target. I honestly felt much more at home in this angled position. It is how I learned to shoot prone in the first place and therefore was familiar and comfortable. I needed no convincing and I didn’t need to be told twice. I was learning from a guy who’s experience and wisdom become more and more obvious as the weekend progressed. I had absolutely no trouble managing recoil or keeping my target in sight all the way to impact.
Body position would become one of the most important topics of the weekend. It would be constantly evaluated and reinforced and now I know why. It probably had the greatest impact on my success (or failure). Don’t let the rifle dictate your position was the mantra of the weekend. The rear bag would also prove to be my savior or nemesis depending on how well I built my position. As I would learn over the course of the weekend, a well packed rear bag was a major aspect in making the rifle conform to your position and not vice versa. The shooter’s hold on the stock should be thought of as a four-way lock between the head and the bag and the hands and the shoulder. If the rear bag exhibits any kind of give or springiness than that’s going to ultimately manifest itself in shots going either high or low depending on the shooters tendencies.
We spent a fair amount of time talking about the environment of course. The effects of altitude, temperature, pressure and humidity were all covered. We covered in depth the effect of various types of winds and their effect on a projectile. We learned that wind patterns aren’t just random occurrences and that patterns emerge depending on particular environmental circumstances. Finally we talked about methods of observation for determining the proper wind adjustments at range. We would have an opportunity at the range later to work on these skills. We spent the next hour or so working on insuring that each shooter’s rifle was set up properly. Length of pull and eye relief were carefully considered. We discussed focus and the importance of properly managing parallax. Scopes were adjusted, lapped and leveled and we were ready to shoot.
The shooting was done on a farm that was principally used to produce and harvest hay. We had three primary shooting locations.

A shooter checking his zero at 100 yards.
A small area that had been carved out to 100 yards for the purposes of checking that the rifles were zeroed and two hilltop locations that reached out to targets at know distances. The first of these areas allowed us to shoot targets at 460, 550, 600, 700, 740 and 800 yards. The second clearing further up the hill allowed us to stretch things out to 880, 1010, 1140 and finally 1200 yards. We finished up day one checking and insuring we had good zeros at 100 yards and then we headed up the hill to do some shooting at the closest targets out to 600 yards. For me, this was in itself a giant leap forward in my pursuit of becoming a precision rifleman. This however just wet our appetites for a full day on this hillside tomorrow. It was nothing short of exhilarating to hit that steel at those relatively short distances. The sun was setting though and anything further would have to wait.
We resumed the second day on the shorter of the two hills. We would spend the first part of the day shooting at targets between 460 and 740 yards. A big part of our process was what was referred to as “truing” our data. That process involved using our base ballistic data for each shooter’s rifle and ammo and then essentially checking and correcting the data. It was an interesting process. I actually had ballistic data from two different sources. One created online at JBM Ballistic.com and one generated on my phone app Ballistic AE. Interestingly both use the ballistic calculator created by James B. Millard (JBM). The two varied only as much as 0.2 mils with the Ballistic AE having the higher overall drop. As you can see from my “Trued” data, I had consistently more drop than predicted. In some cases this difference was quite significant. What was particularly interesting is how close the trued data was when adjusting the velocity of my bullets in my Ballistic AE app to 2660fps. With a few exceptions, the data is almost exactly the same. This loss in velocity is likely representative of environmental variables not accounted for or a variation in the velocity of the factory loaded Hornady 140gr ELD Match ammunition.

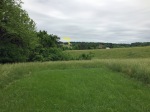
A magnified view from the lower hillside. Distance is in yards.
One of the interesting lessons I learned as a result of this data collection is the importance of consistent velocity. We had several reloaders among the group and this became a very clear example of the importance of collecting chronograph data of your reloads. It was impressed upon us that we should stop focusing on the recipes that produced the smallest groups but instead focus on the recipes that produced the smallest variations in velocity. These would be the bullets that would give us the greatest success in long range shooting. The reasoning seems obvious, but it wasn’t until I saw it demonstrated so clearly in action that the lesson was truly learned.
Once we had tagged all of the targets out to 740 yards, we worked on holdovers. Treating our zero as if it were set at 600 yards we used the mil lines of the reticle to move between targets above and below with adjusting our elevation turrets. This proved to be a useful drill in that up until now we had exclusively dialed in our elevation changes with our turrets. We had already been using holdovers for our windage and would continue to do so. Now we were using holdovers for both elevation and wind and this drill would prove to be that much more useful for me when I ran out of elevation on my scope at 1200 yards later that day. As you will see later, holdovers can be very important when a shot needs to be made quickly or when variables are changing to rapidly to effectively use the turrets. That would do it for the morning session. It was time to break for lunch.
Back from lunch and with more food in our bellies than had business being there with us prone on our stomachs it was time to stretch things out to the greatest distances the farm had to offer. Our next targets would be at: 800, 880, 1010, 1140, and 1203 yards. We had set up further up the hill opposite the targets allowing us to use some of the same targets at longer range while also allowing clear line of sight to some targets previously obstructed by trees. In short order we were back in rhythm moving back up the hill opposite of us hitting the steel targets first at 800, a few minutes later at 880 and then just over 1000 yards. Hitting that target at 1000 yards felt like something special and really made me feel a sense of accomplishment. Don’t get me wrong, people have been making shots at that distance for nearly a hundred and fifty years with rifles and equipment far inferior. It wasn’t anything remotely special. If you want to impress someone these days you better start talking about a couple thousand yards. Nevertheless it was a leap forward for me. The target at 1140 yards was the only target I didn’t manage to hit all weekend. I think i probably took a 6 to 10 shots at it but never quite had it dialed in right. My spotter and I decided my elevation data was good and moved on to 1200.
 As I looked over my data it appeared I was going to need to dial up my elevation an additional full mil for the 60 or so yards going from 1140 to 1203 yards. I reached out and grabbed my elevation turret and attempted to rotate it. It wouldn’t move! Say what? I couldn’t believe it. I had topped out my elevation adjustment on my scope! I was genuinely surprised. The solution of course was to use my mil lines of my reticle to account for the additional mil of elevation needed for this distance. This isn’t a particularly big deal and we practiced this very thing earlier in the day. Because I was using holdovers for my windage as well it did mean that I had no part of the reticle on the target itself. That is to say that I had to imagine that the lines of the reticle extended out to intersect in the middle of the target.
I took three shots at the 1200 yard target. One of my classmates had been drafted into acting as my spotter and he was reasonably nervous to take on the responsibility. Personally, I probably was that much more relaxed as a result. The pressure was now split between the both of us as opposed to just on me. First shot: Hit! Lower left corner of the plate. Second shot: Miss! Just under the target. Third shot: Hit! Nearly dead center of the steal plate! The only thing that could have possibly made it more satisfying was to be able to hear the hit from that far away. That was my last shot of the day. I cleared my weapon, made it safe, and hugged my spotter! I think he may have taken as much satisfaction in making those wind calls as I did in making those shots. It really is a two man game out there. I had an opportunity not long after to do some spotting and wind calls for my fellow shooters. It was a simultaneously fascinating and intimidating experience. To see the bullet travel along its entire flight path and than witness its impact is a neat experience. As far as calling the wind, that’s going to take a whole lot more practice. I felt like most of the time I was calling the wind I was just making my best guess. An educated guess but not a very well educated one.
In closing, the class was a tremendous experience and something I hope to do every year. I could easily participate in the beginner class again but intermediate and advanced classes are also offered. There were several takeaways from the class and much to practice on my own in the coming months. First and foremost is perfecting my position behind my rifle. This was arguably my biggest challenge throughout the weekend. Pulling the trigger is easy. Assuming your data is good and you have made the necessary adjustment to your optic, you will hit your target IF you have properly built your position. Fortunately this is something I can practice at home on my living room floor. Calling the wind is the next big challenge. It was suggested to us that the best way to begin to learn the nuances of calling the wind was to get a inexpensive wind meter and start familiarizing yourself with the surrounding environment. Those trees in your front yard, how do they look when the wind is blowing at a certain intensity? The grass in the fields nearby? The more types of vegetation you familiarize yourself with the better. How the vegetation reacts when it sits in groups or in clusters, or how the tree at the front of the line of trees or the end of the line of trees reacts to the same wind is all very useful information to begin to understand. It simply takes practice and repetition to make the kinds of calls necessary for this kind of shooting.
If you happened to catch my recent mini-review of a long range shooting shooting simulation I purchased in the hopes of helping me prepare for this class, I promised I would talk about how, if at all, the simulation helped. I would say overall the simulation was valuable in helping me become comfortable with using a ballistic table and making appropriate changes to the target turrets of the scope. Holdovers were also a feature of the simulation and obviously their use was an important part of my success over the weekend. The primary feature that was not utilized over the course of the weekend was the measuring of targets to determine distance. We only shot targets at known distance. Overall as I mentioned in that review the simulation had the greatest impact in familiarizing me with the mil-dot reticle and moving me beyond thinking only in terms of MOA. I am already looking forward to next year.

A perspective from our longest shooting position.
Categories: Day at the Range


I live in Louisa VA. and haven’t seen this range, where is it?
LikeLike
This is unfortunately private property and used only with permission.
LikeLike